00:01
So that last rendering took some time. And that was only at a medium resolution.
00:06
You can imagine how time intensive full renderings can be, especially if you have multiple renderings.
00:12
But there's a solution for that.
00:14
Rather than a rendering on your own computer, send it up to the cloud and let Autodesk servers render it for you.
00:22
It must be noted that Flex tokens are required for most renderings in the cloud, you can create a simple rendering without any tokens.
00:30
However, the more advanced the rendering is the higher the resolution is, the more it will cost you in terms of Flex tokens.
00:39
Here in Revit 2024, we will open up our small medical center model once again.
00:46
As before, if you did not complete the previous lesson, you can open up the small medical center cloud model.
00:55
If the model does not open up to the SECOND FLOOR - BREAKROOM 3D view,
00:60
you can make this current by going to your 3D views in your project browser and double clicking on that view.
01:11
So, the process is pretty simple.
01:14
Let's go back to the rendering dialog box and let's just double check our settings.
01:20
We can look at the exposure adjustments.
01:23
But since the last rendering was good, we really don't need to make any changes.
01:28
So, I can cancel out of this.
01:31
On my view tab, I can go to my render gallery from the cloud rendering.
01:37
Let's start by going to the render gallery.
01:43
It opens up in the Autodesk website.
01:49
I am logged in as myself and it shows me how many projects I have and how many Flex tokens I have,
01:55
and a selection of all the renderings that I've done previously.
01:60
If yours does not open up, that means you need to either log into your Autodesk account,
02:05
or perhaps you have to set up an Autodesk account and you may even need to purchase some Flex tokens.
02:12
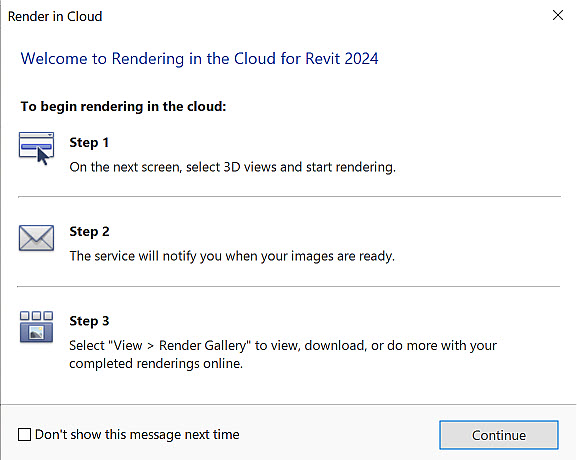
Back in Revit, I go to the Cloud Rendering, Render in Cloud.
02:20
It is a very simple process. Step 1, I select the 3D view and start rendering.
02:27
In step 2, I will be notified when my image is ready.
02:31
And step 3, I go to my render gallery to view the results and download.
02:39
So, I click "Continue".
02:42
And here are the three steps.
02:44
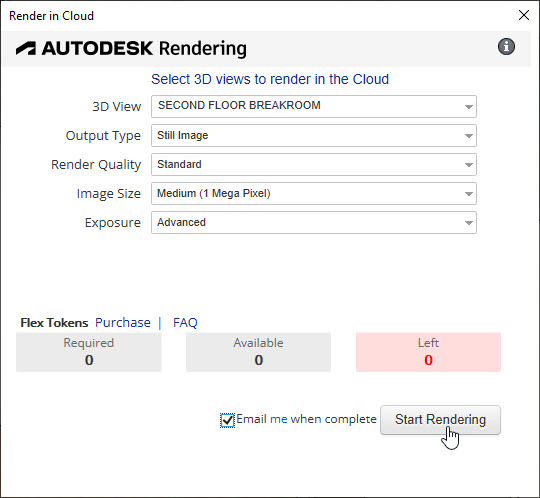
I select my 3D view, which is my SECOND FLOOR - BREAKROOM.
02:49
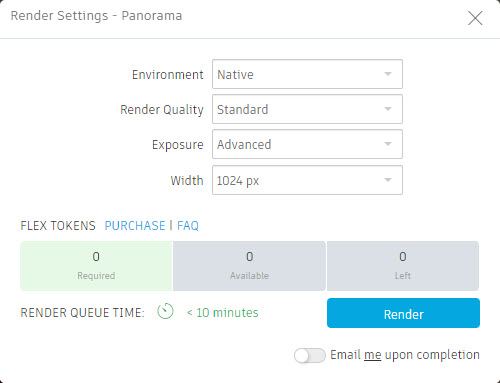
My output type will either be a still image or a panorama, a stereo panorama or a luminance.
02:57
I click "Still Image".
02:59
Notice that currently in my standard quality, no flex tokens are required.
03:06
For my image size, let's go to 16 megapixels and notice that tokens are required.
03:17
For my exposure, it can either be native or advanced.
03:22
The advanced will read the settings that I did earlier in my render dialog box.
03:27
And I do want to receive an email when it is complete, and I can start rendering.
03:32
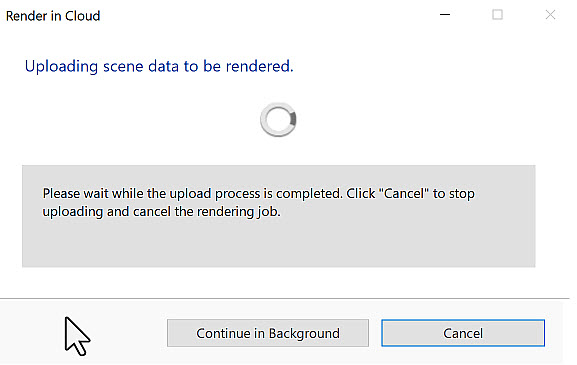
So, it's starting to gather the data.
03:35
And once again, some materials are missing because of graphics files that are lacking.
03:43
Now it's uploading the entire scene.
03:46
I can click on "Continue in Background" and that way I can continue to work.
03:51
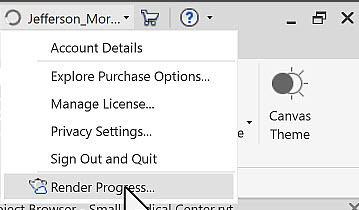
In the meantime, I can see up in the top right corner that it's still rendering.
03:57
And at any point I can click on the render progress and we jump into the gallery and this is where the image will appear when it's done.
04:07
Oh, it just finished rendering. It didn't take that long.
04:10
So, in the render gallery, I can re render if I want to or I can render it as a panorama,
04:18
a stereo panorama, a solar study, a luminance or a turntable.
04:25
For example, let's check out panorama.
04:28
Again, there will be some flex tokens that are required.
04:34
Let's see what that looks like.
04:36
Yes, I do want to receive an email when it's complete and we go to render.
04:43
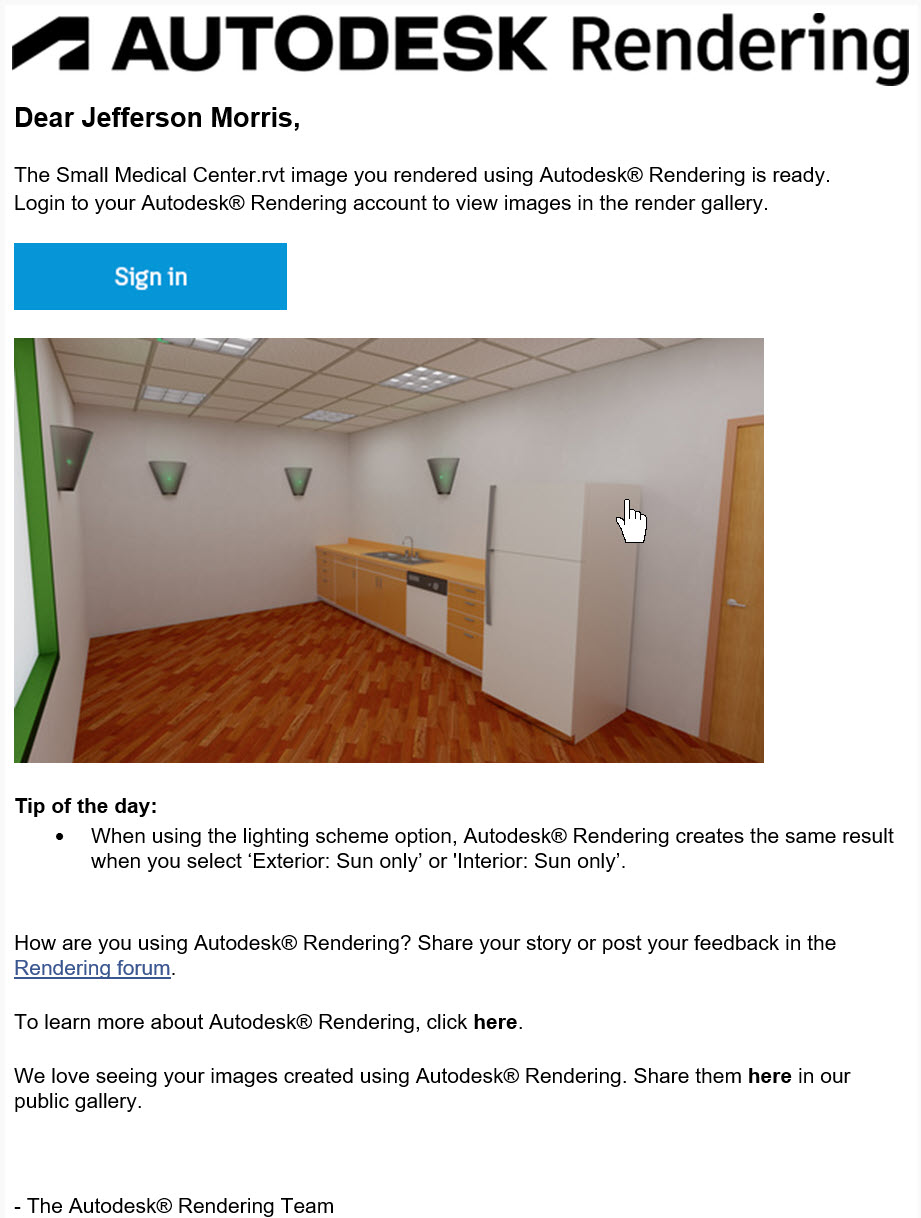
This is the email I received from Autodesk render stating that the rendering is complete and it gives me a few tips.
04:53
When the Panorama is complete in my gallery, I can hold the mouse down and inspect the entire room.
05:00
Talk about a great presentation tool.
05:03
And I can look at the other two images.
05:06
This is the still image that I can download as a JPEG file.
05:14
And the panorama, I can download as an html file.
05:19
And then I can save these in my rendering folder.