& Construction

Integrated BIM tools, including Revit, AutoCAD, and Civil 3D
& Manufacturing

Professional CAD/CAM tools built on Inventor and AutoCAD

Integrated BIM tools, including Revit, AutoCAD, and Civil 3D

Professional CAD/CAM tools built on Inventor and AutoCAD
Any referenced datasets can be downloaded from "Module downloads" in the module overview.
Transcript
00:00
Building project model co-authoring using Revit and the Autodesk Construction Cloud.
00:07
You need to be invited to an Autodesk construction cloud project by a project administrator.
00:12
Once they invite you, you'll get an email like this one here, saying welcome to the project with a link to go to the project.
00:18
To accept the invitation and get started with the project. Click the link. Go to your project.
00:25
This will take you to the project in the web portal of the RLS Construction cloud, as you see here.
00:30
The administrator may also need to give you access to different folders.
00:34
So, if you don't see folders listed here are the folders you're looking for, an administrator may need to add access.
00:41
Once you've been invited and have access to the Autodesk Construction Cloud project.
00:45
The next thing we need to do is set up a project model in Revit.
00:48
Either create a new model from one of your templates or if you have an existing project model, you're going to upload.
00:53
Go ahead and open it and Revit.
00:55
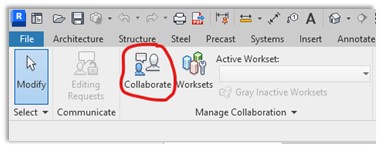
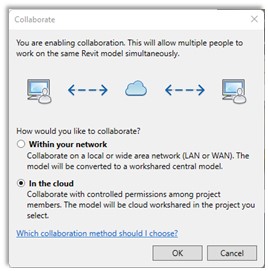
Well, then go to the "Collaborate" tab and "Collaborate in cloud".
01:03
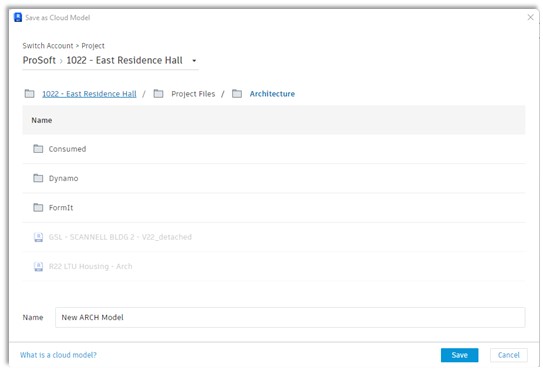
And it's going to open the Save as Cloud Model window.
01:07
We need to pick the account and project you want the file to be uploaded to and then the location.
01:14
This is the architecture team model. So, we'll pick the architecture team folder and click "Save".
01:21
It will then begin uploading that model to the cloud.
01:24
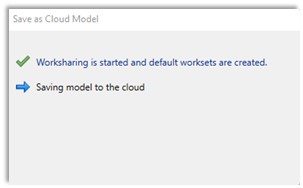
You can monitor the progress right here on this Save as Cloud Model window, as well as the progress bar here in the bottom left corner.
01:33
When the upload is completed, the Save as Cloud Model window will tell you that it is saved to the cloud and you can click "Close".
01:39
You're now working on the cloud central model.
01:42
Now that we have the Revit model uploaded to the cloud,
01:45
you can begin creating and updating model components, adding documentation and whatever other work you need to do in Revit.
01:52
As you're working, click the "Save" button here at the top of Revit.
01:55
This does not synchronize your changes or publish the changes.
01:59
It simply saves them locally so that you have them saved and can keep working.
02:04
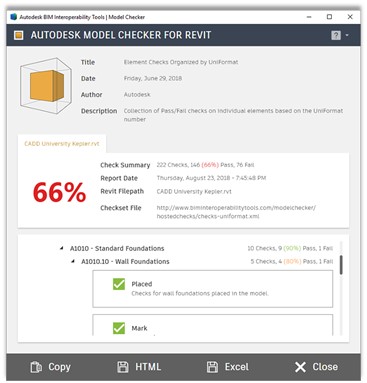
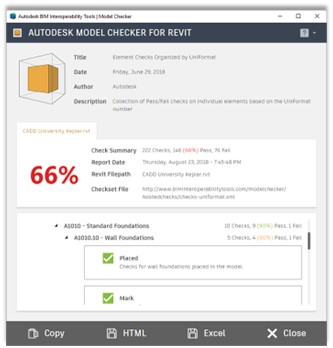
When you're ready to check standards compliance on the BIM interoperability tools, click "Run" to go ahead and run the model checker.
02:12
This will check standards against your model against standards that you set up.
02:15
These standards are going to be based on company Standards, a PEP or project standards.
02:20
For more information on configuring and running the BIM operability tools and the Revit model checker,
02:26
take a look at the accelerator check standards compliance on building projects using Revit.
02:31
That will go into more detail on how to set up and run the standards compliance checker and Revit.
02:36
Once you've checked for standards compliance, the next thing we need to do is synchronize the changes.
02:42
If you go back to "Collaborate" tab,
02:44
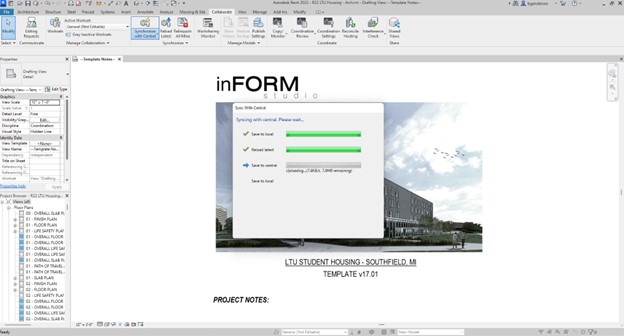
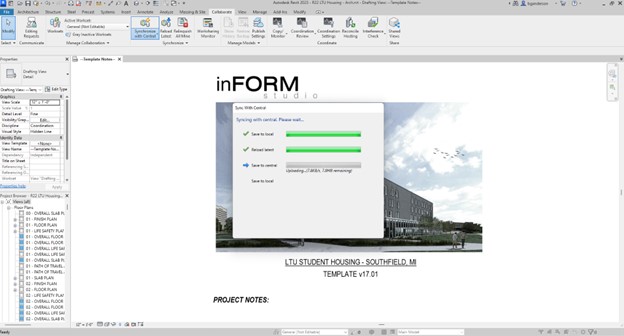
and either "Synchronize with central" or "Synchronize and modify" settings configured to synchronize the way you want it and click "OK".
02:52
This will begin the synchronization and you can monitor progress on this bar.
02:56
Once your changes are synchronized, the window will disappear, and you are completely synchronized.
03:01
At certain intervals, you'll also want to publish your model to your team folder,
03:05
so that those outside of Revit in the Autodesk Construction Cloud web portal can access the file.
03:12
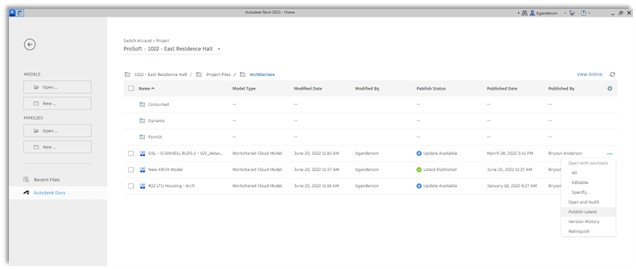
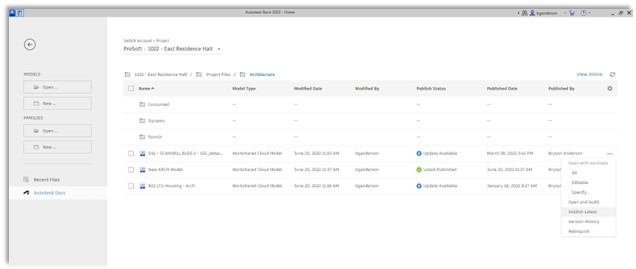
There are a couple ways to do that. On the Revit splash screen, we go back to Autodesk Docs...
03:19
select the account project and drill into the folders where the models exist.
03:25
It will tell us whether there is an update available or the latest is already published.
03:29
For the one we're working on, we can click the dots and say "Publish latest".
03:34
That will begin the publish process.
03:36
If you're using design collaboration, you can also set up automatic publishing.
03:40
The automatic publishing follows a predefined schedule to go ahead and publish that without you having to do anything.
03:47
Next, we'll look at linking other team's Revit models into our work in progress Revit model.
03:53
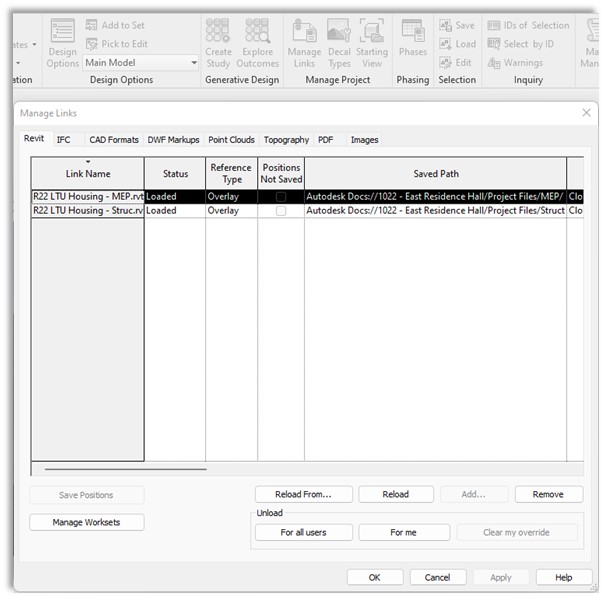
We go to the "Manage tab" and "Manage links".
03:57
It will bring up the manage links window where it will show us any existing links.
04:01
You'll see here that we have two links that are linked to a local location. We want to update those.
04:06
We can also add some new ones but let's go ahead and look at updating one.
04:10
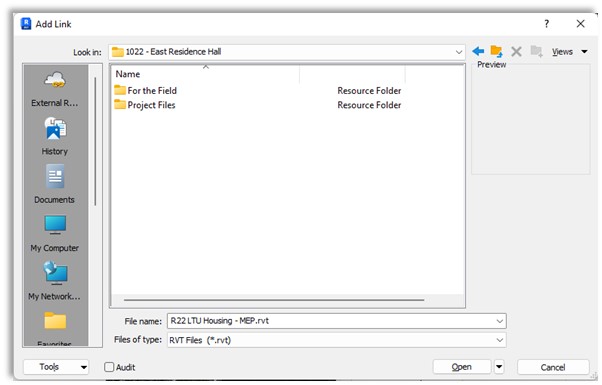
So, whether you're doing add or reload from. You'll get the same dialog box here.
04:17
We want to click on external resources, Autodesk Docs, and then drill down into the project and the folders where we want to link from.
04:27
In this case we're doing the MEP model.
04:29
So, we're going to select the MEP team folder and we'll select that model and go ahead and reload that link.
04:36
Now, we'll begin reloading from the cloud location.
04:42
Once that finishes, you'll see the saved path updated to the Autodesk Docs location in that project file,
04:47
and the team folder will be selected.
04:50
I will also tell us that it's a cloud file.
04:52
We can then add more or go ahead and "Reload from" to fix the rest of our links.
04:58
Now that we have all of our link's set. We'll go ahead and close this dialog box.
05:02
We can then continue working in Revit, creating an updated model components and documentation.
05:08
Then we can also go back and check our standards and click "Run" to run that standards checker.
05:15
We will then want to synchronize again and synchronize from this shortcut here or from the collaborate tab.
05:22
That Sync with Central will begin.
05:25
Depending on the number of changes you've made, it should sync pretty quickly.
05:30
It'll give you the successful message and close.
05:34
Your changes are synchronized.
05:36
You want to publish again, you can go back to the Revit splash screen and again,
05:42
click on any of these ellipses to publish latest or see that the model is already published latest.
05:49
This is the looping workflow that you'll follow, continuing to make changes.
05:53
Check your standards, synchronize, and publish.
Video transcript
00:00
Building project model co-authoring using Revit and the Autodesk Construction Cloud.
00:07
You need to be invited to an Autodesk construction cloud project by a project administrator.
00:12
Once they invite you, you'll get an email like this one here, saying welcome to the project with a link to go to the project.
00:18
To accept the invitation and get started with the project. Click the link. Go to your project.
00:25
This will take you to the project in the web portal of the RLS Construction cloud, as you see here.
00:30
The administrator may also need to give you access to different folders.
00:34
So, if you don't see folders listed here are the folders you're looking for, an administrator may need to add access.
00:41
Once you've been invited and have access to the Autodesk Construction Cloud project.
00:45
The next thing we need to do is set up a project model in Revit.
00:48
Either create a new model from one of your templates or if you have an existing project model, you're going to upload.
00:53
Go ahead and open it and Revit.
00:55
Well, then go to the "Collaborate" tab and "Collaborate in cloud".
01:03
And it's going to open the Save as Cloud Model window.
01:07
We need to pick the account and project you want the file to be uploaded to and then the location.
01:14
This is the architecture team model. So, we'll pick the architecture team folder and click "Save".
01:21
It will then begin uploading that model to the cloud.
01:24
You can monitor the progress right here on this Save as Cloud Model window, as well as the progress bar here in the bottom left corner.
01:33
When the upload is completed, the Save as Cloud Model window will tell you that it is saved to the cloud and you can click "Close".
01:39
You're now working on the cloud central model.
01:42
Now that we have the Revit model uploaded to the cloud,
01:45
you can begin creating and updating model components, adding documentation and whatever other work you need to do in Revit.
01:52
As you're working, click the "Save" button here at the top of Revit.
01:55
This does not synchronize your changes or publish the changes.
01:59
It simply saves them locally so that you have them saved and can keep working.
02:04
When you're ready to check standards compliance on the BIM interoperability tools, click "Run" to go ahead and run the model checker.
02:12
This will check standards against your model against standards that you set up.
02:15
These standards are going to be based on company Standards, a PEP or project standards.
02:20
For more information on configuring and running the BIM operability tools and the Revit model checker,
02:26
take a look at the accelerator check standards compliance on building projects using Revit.
02:31
That will go into more detail on how to set up and run the standards compliance checker and Revit.
02:36
Once you've checked for standards compliance, the next thing we need to do is synchronize the changes.
02:42
If you go back to "Collaborate" tab,
02:44
and either "Synchronize with central" or "Synchronize and modify" settings configured to synchronize the way you want it and click "OK".
02:52
This will begin the synchronization and you can monitor progress on this bar.
02:56
Once your changes are synchronized, the window will disappear, and you are completely synchronized.
03:01
At certain intervals, you'll also want to publish your model to your team folder,
03:05
so that those outside of Revit in the Autodesk Construction Cloud web portal can access the file.
03:12
There are a couple ways to do that. On the Revit splash screen, we go back to Autodesk Docs...
03:19
select the account project and drill into the folders where the models exist.
03:25
It will tell us whether there is an update available or the latest is already published.
03:29
For the one we're working on, we can click the dots and say "Publish latest".
03:34
That will begin the publish process.
03:36
If you're using design collaboration, you can also set up automatic publishing.
03:40
The automatic publishing follows a predefined schedule to go ahead and publish that without you having to do anything.
03:47
Next, we'll look at linking other team's Revit models into our work in progress Revit model.
03:53
We go to the "Manage tab" and "Manage links".
03:57
It will bring up the manage links window where it will show us any existing links.
04:01
You'll see here that we have two links that are linked to a local location. We want to update those.
04:06
We can also add some new ones but let's go ahead and look at updating one.
04:10
So, whether you're doing add or reload from. You'll get the same dialog box here.
04:17
We want to click on external resources, Autodesk Docs, and then drill down into the project and the folders where we want to link from.
04:27
In this case we're doing the MEP model.
04:29
So, we're going to select the MEP team folder and we'll select that model and go ahead and reload that link.
04:36
Now, we'll begin reloading from the cloud location.
04:42
Once that finishes, you'll see the saved path updated to the Autodesk Docs location in that project file,
04:47
and the team folder will be selected.
04:50
I will also tell us that it's a cloud file.
04:52
We can then add more or go ahead and "Reload from" to fix the rest of our links.
04:58
Now that we have all of our link's set. We'll go ahead and close this dialog box.
05:02
We can then continue working in Revit, creating an updated model components and documentation.
05:08
Then we can also go back and check our standards and click "Run" to run that standards checker.
05:15
We will then want to synchronize again and synchronize from this shortcut here or from the collaborate tab.
05:22
That Sync with Central will begin.
05:25
Depending on the number of changes you've made, it should sync pretty quickly.
05:30
It'll give you the successful message and close.
05:34
Your changes are synchronized.
05:36
You want to publish again, you can go back to the Revit splash screen and again,
05:42
click on any of these ellipses to publish latest or see that the model is already published latest.
05:49
This is the looping workflow that you'll follow, continuing to make changes.
05:53
Check your standards, synchronize, and publish.

How to buy
Privacy | Do not sell or share my personal information | Cookie preferences | Report noncompliance | Terms of use | Legal | © 2025 Autodesk Inc. All rights reserved
Sign in to start learning
Sign in for unlimited free access to all learning content.Save your progress
Take assessments
Receive personalized recommendations
May we collect and use your data?
Learn more about the Third Party Services we use and our Privacy Statement.May we collect and use your data to tailor your experience?
Explore the benefits of a customized experience by managing your privacy settings for this site or visit our Privacy Statement to learn more about your options.