00:02
MARTHA HOLLOWELL ORCUTT: Creating MEP Filters
00:04
for Views within Revit.
00:06
In this video, we're going to create
00:08
filters for gas and liquid refrigerant piping systems.
00:12
We are then going to add the filters to a view
00:15
and apply overrides to the filters
00:17
so that you can distinguish the difference between the two
00:23
I've opened the small medical center on the O1 ground floor
00:29
As you can see, we have supply, return,
00:31
and exhaust duct work in this view
00:34
and also two types of piping.
00:37
So I'm going to zoom in on some of the piping
00:40
and turn on Thin Lines so that we
00:42
can see there are two of them.
00:45
When I select some of the piping and then scroll down
00:49
into Properties, you can see that this has a System
00:57
Type of Gas Refrigerant Piping.
01:00
When I click on the other, you can
01:02
see that its system is Liquid Refrigerant Piping.
01:06
Now I know the type of filters I need to create.
01:10
In the View tab, I'm going to Filters.
01:13
This Filters dialog box is where I can create and modify filters
01:17
on a project-wide basis.
01:19
Then I can add them to views.
01:22
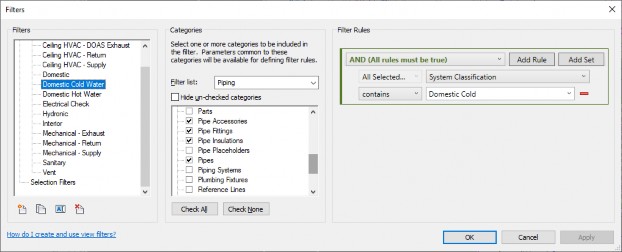
First, let's look at an existing filter, Domestic Cold Water.
01:26
As you can see, a filter is made from categories of elements--
01:31
in this case, piping--
01:43
and then Filter Rules.
01:46
Filter Rules are based on one of two types of conditions--
01:50
AND, where all rules must be true, or OR,
01:54
where any rule can be true.
01:56
You can have several rules applied.
01:59
Just be sure to keep track of the OR and AND options.
02:04
In this case, there's only one rule.
02:07
Since I've selected several categories,
02:09
I can only pick on the parameters that are
02:12
assigned to all the selected.
02:15
As you can see here, System Classification is chosen,
02:19
but there are others you can choose from as well.
02:26
The next step is to choose an operator.
02:28
This example uses contains, but you can see from the list
02:33
that there are a lot of options as well.
02:36
The final step is adding a value.
02:40
When you use contains, you need to type in that information.
02:44
In this case, Domestic Cold is typed in.
02:48
Now let's make a filter of our own.
02:52
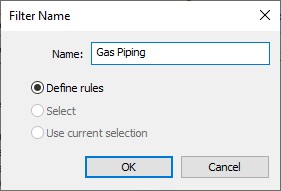
At the bottom of the dialog box, I'm clicking New.
02:56
Then, in the Filter Name dialog box,
02:59
I'm going to type Gas Piping.
03:04
With Defined Rules selected, I will click OK.
03:14
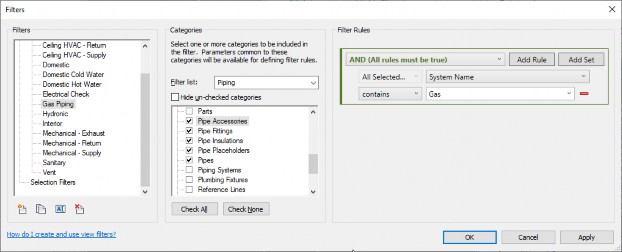
Now we need to make it useful.
03:16
First, I want to specify which categories this filter
03:21
I have the Filter list set to Piping.
03:24
And I scroll down and select all the various piping categories.
03:31
Next, I move to the Filter Rules section.
03:34
I'm going to use AND, so all the rules must be true.
03:38
I'm going to select the System Name.
03:48
And then I'm going to set the Operator to contains and type
03:57
In this project, this filter will pick up
03:59
all the gas refrigerant piping, but it
04:02
could pick up any piping system that contains the word
04:09
Now I'm ready to create the next rule.
04:12
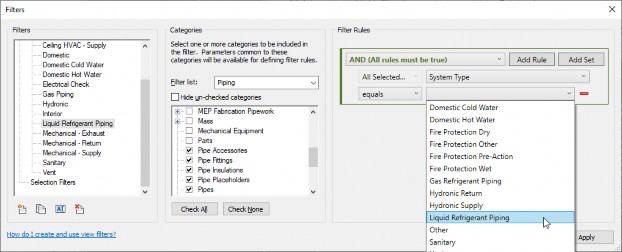
In this case, I'm going to duplicate the Gas Piping.
04:18
I select the New Filter, click Duplicate, and then
04:24
select the New Filter again and rename it
04:27
to Liquid Refrigerant Piping.
04:31
I'm going to be a little bit more precise in my naming
04:40
Since this is piping as well, I don't
04:43
need to make any changes to my categories.
04:46
I'm going to change the parameter to System Type,
04:49
contains to equals, and now, because I
04:53
had specified a parameter that has values,
04:56
I can choose from the list, and I'm
04:58
going to choose Liquid Refrigerant Piping.
05:02
I click OK, and those filters are added to my project.
05:11
Now I want to apply the filters to my view.
05:14
In this view, I'm typing VV and then selecting the Filters tab.
05:20
New filters are not automatically added
05:22
to the view, so I need to do that now.
05:25
I'm going to click Add, and in the Add Filters dialog box,
05:30
I'm going to select my Gas Piping and Liquid Refrigerant
05:33
Piping and click OK.
05:38
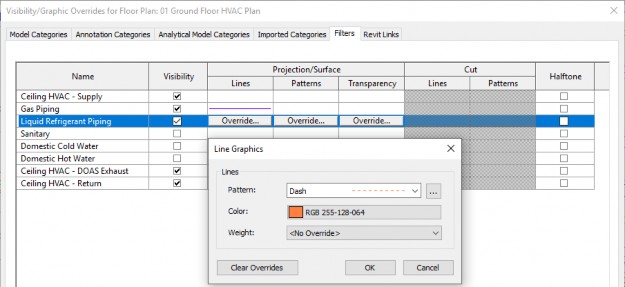
Now, I want to have those filters visible,
05:40
but I do want to turn off my Sanitary Domestic Cold Water
05:44
and Domestic Hot Water.
05:46
And then I'm going to create overrides to these.
05:50
For the Liquid Refrigerant Piping,
05:53
I want to create a line graphics override
05:56
and I'm going to use the pattern dash and then an orange color.
06:12
And then, for Gas Piping, I'm not
06:14
going to change the pattern, but I
06:16
am going to specify a different color, and I'll pick a purple.
06:20
And click OK again and OK until I am out of the dialog box.
06:28
Now there's a noticeable difference
06:30
in the colors of the different systems.