| |
Completion of Updating Title Block Attributes Lesson
| |
Objective: In this exercise, you create a title block mapping file and update the title block attributes. You complete the following steps:
■ Open a drawing and select the title block to map information to.
■ Map project and drawing information to the title block attributes.
■ Update the title block using the newly created mapping file.
|
| |
Process: To open drawing and select title block
|
| |
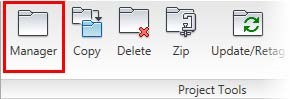
1: If the Project Manager is not displayed, on the Project tab, Project Tools panel, click Manager.
|
| |
2: If Custom_Data_NFPA is the active project, skip to step 6. If it is open but not active, in the Project Manager, do the following:
■ Right-click Custom_Data_NFPA.
■ Click Activate.
■ Skip to step 6.
|
| |
3: In the Project Manager, click Open Project.
|
| |
4: Browse to where you installed the exercise files. Select Custom_Data_NFPA.wdp. Click Open.
|
| |
5: From the Projects list, click the expansion node next to Custom_Data_NFPA to expand the drawing list.
|
| |
6: Right-click Custom_Data_NFPA_01.dwg. Click Open.
|
| |
7: Click on Layout1 in the lower left-hand corner of your screen to switch to paper space, then Zoom in to the title block in the lower-right corner.

Notice the title block does not have project and drawing information.
|
| |
8: In the Project Manager, right-click Custom_Data_NFPA. Click Descriptions.
|
| |
9: In the Project Description dialog box, do the following:
■ For Job Number, type 12345-67
■ For Date, type today's date.
■ For Engineer, type your initials.
■ Click OK.
|
| |
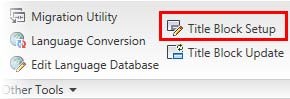
10: On the Project tab, Other Tools panel, click Title Block Setup.
|
| |
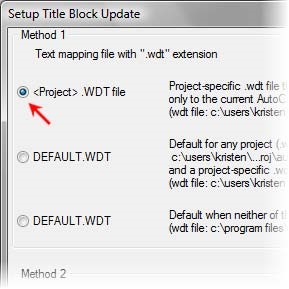
11: In the Setup Title Block Update dialog box, select <Project>.WDT file. Click OK.
|
| |
12: In the .WDT File Exists dialog box, click Overwrite.
|
| |
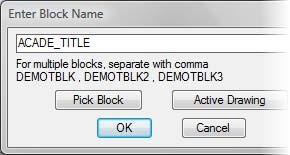
13: In the Enter Block Name dialog box, click Pick Block.
|
| |
14: In the drawing, select the title block. Press ENTER to end selection.
|
| |
15: In the Enter Block Name dialog box, click OK.
|
| |
16: Map Project and Drawing Data to Attributes:
In this section you create the mappings between the AutoCAD® Electrical data and the title block attributes, creating the mapping file that is used by the Title Block Update command.
In the Title Block Setup dialog box, do the following:
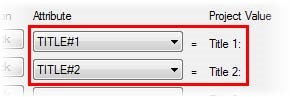
■ For Project Value, Title 1, select TITLE#1 from the list.
■ For Project Value, Title 2, select TITLE#2 from the list.
|
| |
17: In the Title Block Setup dialog box, do the following:
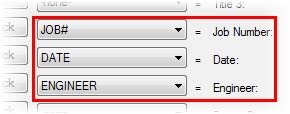
■ For Project Value, Job Number, select JOB# from the list.
■ For Project Value, Date, select DATE from the list.
■ For Project Value, Engineer, select ENGINEER from the list.
|
| |
18: In the Title Block Setup dialog box, do the following:
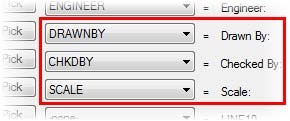
■ For Project Value, Drawn By, select DRAWNBY from the list.
■ For Project Value, Checked By, select CHKDBY from the list.
■ For Project Value, Scale, select SCALE from the list.
|
| |
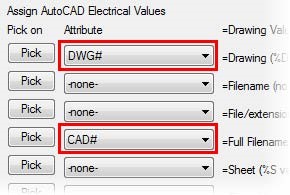
19: Click Drawing Values, In the Title Block Setup (Assign AutoCAD Electrical Values) dialog box, do the following:
■ For Drawing Value, Drawing (%D Value), select DWG# from the list.
■ For Drawing Value, Full Filename, select CAD# from the list.
|
| |
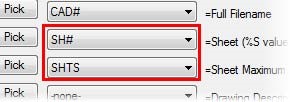
20: In the Title Block Setup dialog box, do the following:
■ For Drawing Value, Sheet (%S Value), select SH# from the list.
■ For Drawing Value, Sheet Maximum, select SHTS from the list.
|
| |
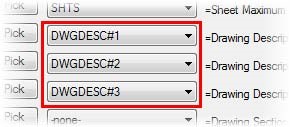
21: In the Title Block Setup dialog box, do the following:
■ For Drawing Value, Drawing Description 1, select DWGDESC#1 from the list.
■ For Drawing Value, Drawing Description 2, select DWGDESC#2 from the list.
■ For Drawing Value, Drawing Description 3, select DWGDESC#3 from the list.
■ Click OK.
The mapping file Custom_Data_NFPA.wdt is created and saved in the active project directory.
|
| |
22: Update Title Blocks
In the Project Manager, right-click Custom_Data_NFPA. Click Title Block Update.
|
| |
23: In the Update Title Block dialog box, do the following:
■ Under Select Line(s) to Update (Project Description Lines), click Select All.
■ Under Select Line(s) to Update (these are per-drawing values), select all check boxes except Resequence Sheet %S Values.
■ Click Save.
|
| |
24: In the AutoCAD message dialog box, click OK.
|
| |
25: Click OK Active Drawing Only.

|
|


