Updating objects with imported data
Any referenced datasets can be downloaded from "Module downloads" in the module overview.
Transcript
00:03
When using InfoWorks WS Pro, you can update a great number of objects simultaneously using imported data.
00:11
The Open Data Import Centre is one of the primary tools used to build models because it contains many ways to control data imports.
00:19
For example, you may want to update the diameter or material of pipes in a network without adding or removing them.
00:27
In this example, you will use a shapefile containing pipe data from a GIS system.
00:32
This file contains all the pipes in our current model, with some diameters updated.
00:37
You will often have to work with files that have new pipes, or pipes that have changed ID,
00:42
which can be handled with more advanced data workflows.
00:46
First, open the BridgeTown model group, and then open the BridgeNet network by clicking and dragging it into the workspace.
00:53
In the Network tab, select Import.
00:57
From the flyout, click Open Data Import Centre (Network) to open the dialog.
01:03
First, you need to indicate what type of data you are importing.
01:08
In the Table To Import Data Into group box, expand the drop-down and select Pipe.
01:16
In the Data Source group box, find the Source Type: drop-down and pick Raw Shape File.
01:23
Click the ellipses (…) to open a file browser.
01:26
Navigate to the Data folder, then Pipes, and select pipe.shp.
01:33
Click Open.
01:35
In the Flag Behavior group box, find the drop-down next to Otherwise, set flag on imported fields to:.
01:42
Expand it and pick #I (the “I” stands for “imported”).
01:45
Check the box next to Only flag genuine changes to data values.
01:50
In the Updating and Delete Options group box, make sure Overwrite is enabled,
01:55
which means we will overwrite any existing values in our model, if they exist in our imported file.
02:01
Check the boxes next to Update based on asset ID and Only update existing objects.
02:07
Notice that when you check Update based on Asset ID, the Asset ID row in the Field Mapping Configuration turned red.
02:15
This indicates that this field is your key, which will be used to match records in your import file.
02:21
This is an important concept to understand when updating models and data.
02:27
Click the Auto-Map button.
02:29
Notice that the diameter and material rows in the Field Mapping Configuration are now assigned import fields.
02:35
This happened because the field names in the import file match WS Pro.
02:40
However, the ID field in the import file is named something different, so expand the drop-down in the Asset ID import field,
02:48
and select UID from the import file.
02:52
Click Import.
02:54
The notification will say that many pipes were updated, but this only means that you matched this many pipes to your import file,
03:00
not that this many values were changed.
03:03
You will verify this in a moment.
03:05
Click OK, and then close the Open Data Import Centre dialog.
03:10
Now that the data has been imported, you can compare the changes.
03:14
Right-click the BridgeNet network, and pick Compare... to open the Compare Object dialog.
03:21
Check the box next to Select changed objects in the dialog.
03:26
Click Show difference to open a list of changes.
03:30
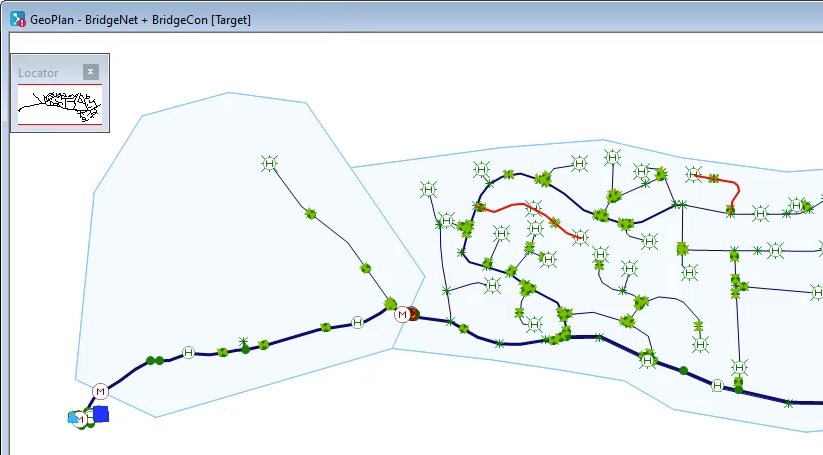
Switch to the GeoPlan and you will see the pipes that were updated.
03:34
Commit the changes you made to the network.
00:03
When using InfoWorks WS Pro, you can update a great number of objects simultaneously using imported data.
00:11
The Open Data Import Centre is one of the primary tools used to build models because it contains many ways to control data imports.
00:19
For example, you may want to update the diameter or material of pipes in a network without adding or removing them.
00:27
In this example, you will use a shapefile containing pipe data from a GIS system.
00:32
This file contains all the pipes in our current model, with some diameters updated.
00:37
You will often have to work with files that have new pipes, or pipes that have changed ID,
00:42
which can be handled with more advanced data workflows.
00:46
First, open the BridgeTown model group, and then open the BridgeNet network by clicking and dragging it into the workspace.
00:53
In the Network tab, select Import.
00:57
From the flyout, click Open Data Import Centre (Network) to open the dialog.
01:03
First, you need to indicate what type of data you are importing.
01:08
In the Table To Import Data Into group box, expand the drop-down and select Pipe.
01:16
In the Data Source group box, find the Source Type: drop-down and pick Raw Shape File.
01:23
Click the ellipses (…) to open a file browser.
01:26
Navigate to the Data folder, then Pipes, and select pipe.shp.
01:33
Click Open.
01:35
In the Flag Behavior group box, find the drop-down next to Otherwise, set flag on imported fields to:.
01:42
Expand it and pick #I (the “I” stands for “imported”).
01:45
Check the box next to Only flag genuine changes to data values.
01:50
In the Updating and Delete Options group box, make sure Overwrite is enabled,
01:55
which means we will overwrite any existing values in our model, if they exist in our imported file.
02:01
Check the boxes next to Update based on asset ID and Only update existing objects.
02:07
Notice that when you check Update based on Asset ID, the Asset ID row in the Field Mapping Configuration turned red.
02:15
This indicates that this field is your key, which will be used to match records in your import file.
02:21
This is an important concept to understand when updating models and data.
02:27
Click the Auto-Map button.
02:29
Notice that the diameter and material rows in the Field Mapping Configuration are now assigned import fields.
02:35
This happened because the field names in the import file match WS Pro.
02:40
However, the ID field in the import file is named something different, so expand the drop-down in the Asset ID import field,
02:48
and select UID from the import file.
02:52
Click Import.
02:54
The notification will say that many pipes were updated, but this only means that you matched this many pipes to your import file,
03:00
not that this many values were changed.
03:03
You will verify this in a moment.
03:05
Click OK, and then close the Open Data Import Centre dialog.
03:10
Now that the data has been imported, you can compare the changes.
03:14
Right-click the BridgeNet network, and pick Compare... to open the Compare Object dialog.
03:21
Check the box next to Select changed objects in the dialog.
03:26
Click Show difference to open a list of changes.
03:30
Switch to the GeoPlan and you will see the pipes that were updated.
03:34
Commit the changes you made to the network.
Video quiz
Step-by-step Guide
The Open Data Import Centre contains many ways to control data imports. For example, it can be used to update the diameter or material of pipes in a network without adding or removing them. Users often have to work with files that have new pipes, or pipes that have changed ID.
To import a shapefile that contains pipe data from a GIS system:
- From the Model Group window, under BridgeTown, drag the BridgeNet network and drop it into the workspace.
- Select Network > Import > Open Data Import Centre (Network).

- To indicate the type of data you are importing, in the open Data Import Centre dialog box, in the Table To Import Data Into group box, expand the drop-down and select Pipe.
- In the Data Source group box, expand the Source Type: drop-down and pick Raw Shape File.
- Next to the File box, click the Browse (…) button to open a file browser.

- Navigate to the Data folder.
- Open the Pipes folder.
- Select pipe.shp.
- Click Open.

- In the Flag Behaviour group box, expand the drop-down next to Otherwise, set flag on imported fields to: and pick #I. (The “I” stands for “imported”)
- Enable Only flag genuine changes to data values.
- In the Updating and Delete Options group box, make sure Overwrite is enabled, which means we will overwrite any existing values in our model, if they exist in the imported file.
- Select Update based on asset ID.
- Select Only update existing objects.

IMPORTANT: Notice that when you check Update based on Asset ID, the Asset ID row in the Field Mapping Configuration turns red. This indicates that this field is the key, which will be used to match records in the import file.
- Click the Auto-Map button.
The diameter and material rows in the Field Mapping Configuration are now assigned import fields, because the field names in the import file match WS Pro. However, the ID field in the import file is named something different.
- In the Asset ID row, under Import Fields, expand the drop-down and select UID from the import file.
- Click Import.

The notification reports that many pipes were updated, meaning that this number of pipes matched the import file, not that this number of values were changed. You will verify this information below.
- Click OK.
- Close the Open Data Import Centre dialog box.
Now that the data has been imported, compare the changes:
- In the Model Group window, right-click the BridgeNet network, and select Compare.

- In the Compare Object dialog box, enable Select changed objects.
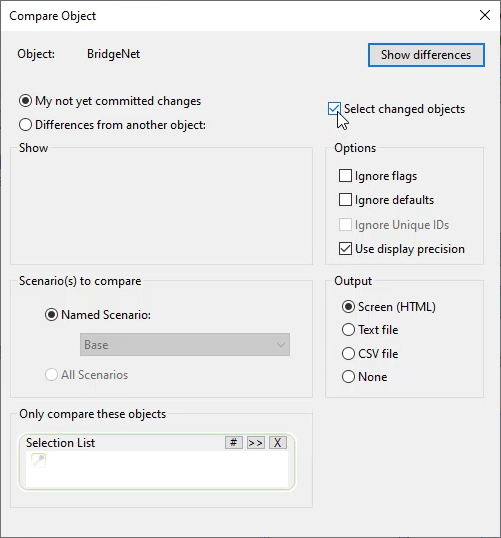
- Click Show differences to open a list of changes.

- Switch to the GeoPlan to see the pipes that were updated highlighted in red.
- Commit the changes you made to the network.