00:01
Welcome to the continuation of managing point cloud
00:04
data in recap this objective is using non structured point
00:09
And it is the third and last objective in this course,
00:14
we learned in the previous objectives.
00:16
There's two different types of scan data.
00:18
We talked about structured scan data.
00:21
And now let's look at non structured data
00:24
non structured data is scanned data
00:27
from Ariel mobile and photo processed data.
00:30
Most of your infrastructure related
00:32
data is going to be of this type the structured scan workflow
00:38
and recap begins with the import of the cloud data
00:42
and setting up the project settings.
00:45
Then the automatic index and registration happens.
00:49
And now we can perform visualization measurement
00:52
cleanup and data elimination tasks
00:55
before we create and export the regions
00:58
to be used in Autodesk and other software solutions.
01:02
We begin the workflow by setting the project folder
01:07
Then we'll add the point cloud data files
01:10
and set the appropriate geographic coordinate system.
01:13
Here we'd be let's look at how we begin by setting up
01:16
the project folder location and name adding the files
01:20
and setting the coordinate system.
01:23
We'll click on Import the point cloud
01:25
will browse to designate the folder location
01:28
and give our project a name next, we either drag and drop
01:32
or browse and open the point cloud files.
01:36
Here I have seven l.a. s point cloud data files.
01:40
I'll click on the advanced tab so that I can
01:43
look at the coordinate systems.
01:46
We will load up the Autodesk coordinate system library.
01:49
And select the appropriate coordinate system.
01:58
Next, we'll click on Import the files
02:00
to begin the automatic scan and registration process.
02:06
Note that the little icon that looks
02:07
like a web that is associated with each of the import files
02:13
indicates that the files are unstructured point cloud data.
02:19
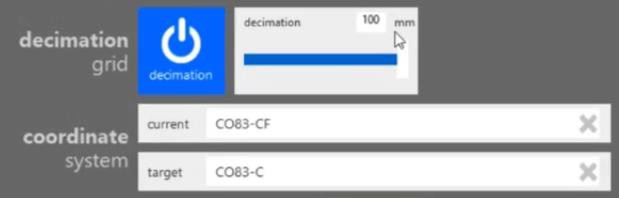
Let's review the advanced the settings decimation indicates
02:23
the level of detail and if we look
02:25
at the geographic coordinate systems
02:27
we notice that we have a current and a target.
02:31
This means that we can transform the point cloud from one
02:35
coordinate system to another.
02:37
Using recap what is decimation.
02:40
It's good to know about decimation because this
02:43
represents the level of detail of the points in our point
02:46
cloud to show the size of the decimation.
02:49
The picture on the right shows a
02:54
This is the same as 10 centimeters
02:55
too much data in point clouds will
02:58
affect the performance and the overall project efficiency.
03:02
In our example, we've set the decimation
03:05
to the maximum amount of 100 millimeters.
03:09
By knowing the precision of the project
03:11
we've taken the first step to make our data little bit
03:15
What exactly is indexing and registration.
03:18
The imported files have to be indexed.
03:21
And registered so they can be used in recap.
03:24
This can take some time and a progress bar at the bottom
03:27
will indicate the activity.
03:30
Note that suspending the project is the same as canceling out
03:34
of the project indexing reads the raw point cloud file,
03:38
and it converts it to the proprietary recap
03:42
file registration merges or stitches
03:45
multiple scans into one aggregated point cloud.
03:50
Now automatic registration happens
03:52
for our non structured type data in the previous objective.
03:57
We looked at manual registration, which
03:59
we did for structured point cloud data,
04:03
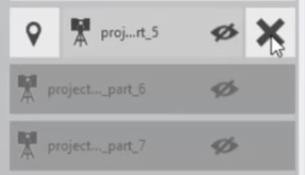
we can view the location of each of the scanned data files
04:07
and check for the ability to possibly do some data deletion.
04:12
This will improve the project efficiency
04:14
by reducing the amount of overall point cloud data.
04:18
Here we expand the scan locations
04:21
and see how many points are in each scan
04:28
and then we can turn the visibility on and off.
04:32
We can see that these files are not
04:34
needed for our project area, which is in the lower portion.
04:39
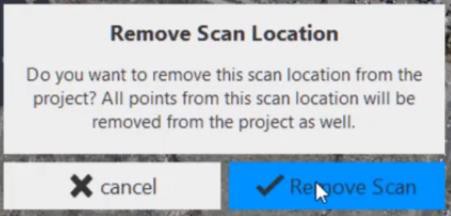
And so I can easily eliminate this data,
04:44
we'll remove the scan data.
04:47
And it will also remove the points.
04:49
We'll do this for three of the seven files.
04:54
Next, we need to review our point cloud data.
04:56
We need to check our measurements
04:58
and verify the coordinates.
04:60
So that we know that the units and the scale are correct.
05:03
We need to do this with both horizontal
05:06
and vertical measurements.
05:08
We also need to identify the northern and eastern
05:11
coordinates to validate that our point cloud is
05:14
in the proper coordinates.
05:16
In the first objective of this course,
05:18
we learned how to take those measurements.
05:21
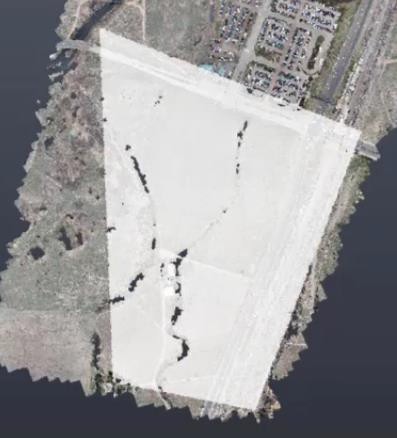
Next, we need to create regions.
05:24
So that we can manage our point cloud even more efficiently
05:28
will create regions with data to identify data to keep
05:33
and data to remove in the scan locations.
05:37
We can see the remaining four original l.a.
05:39
s files all of our point cloud data
05:43
resides in the unassigned point category.
05:46
The unassigned point category always gets exported.
05:50
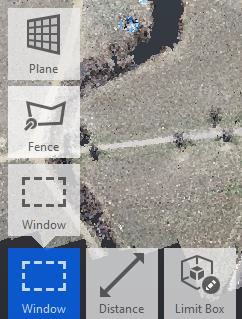
So I'm going to make a region using the fence option.
05:56
Once I've selected the fence.
05:58
I create a new region and I'm going
05:60
to name it the development area.
06:02
This is the area of our interest for our project.
06:06
Notice I put the word keep on it.
06:09
I can turn this on and off.
06:11
So we can see the area that we want
06:13
to keep the next region I'm going
06:15
to make again, using the fence.
06:18
Option I'm going to call this region, the remove region.
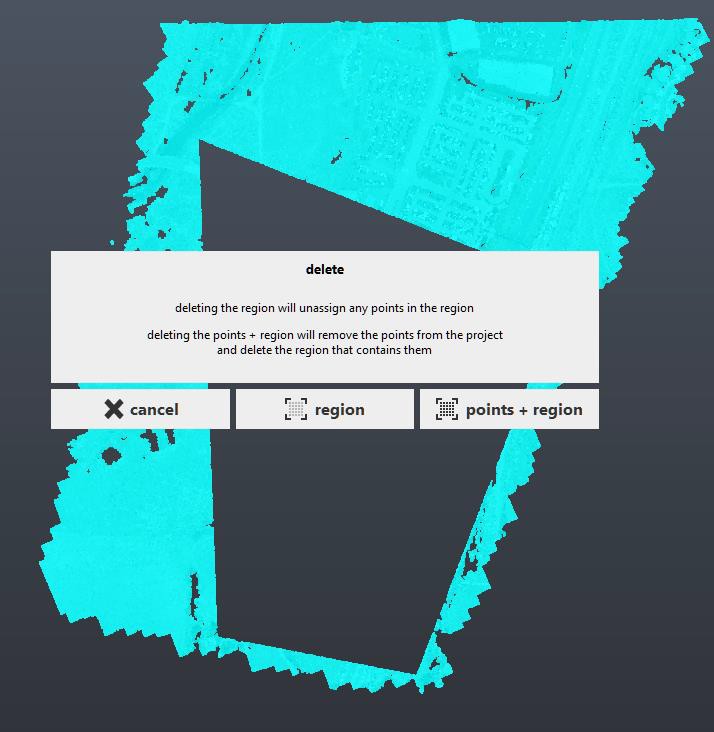
06:35
Now we can see both of these regions.
06:38
And I'm going to delete the remove region, which
06:41
is the point and the region itself.
06:44
Now what this leaves us with is two
06:46
regions the unassigned point region, which is very tiny
06:51
and the development region.
06:54
I will browse to the location for these files
06:57
and the name of the ECP and the RC s
07:00
will be the names of the region.
07:03
I'll check the unification settings.
07:06
And again, make it the maximum of 100 millimeters
07:09
and then we'll select unify to export the regions
07:15
and here is how the resulting point cloud files
07:18
look in a folder structure.
07:20
We have the development area.
07:22
Keep ECP and that automatically creates
07:26
to support folder of the same name.
07:29
And inside that folder, we see the RCS file.
07:33
The actual point cloud data.
07:35
These experts point cloud regions can
07:37
be used for detailed design and federation
07:40
applications such as civil 3D InfraWorks rivet Navisworks
07:46
and even in autocad and just a final note for those of you
07:50
that are using BIM 360 docs we can store and share point cloud
07:56
data, but it's not visible in the BIM 360 large Model Viewer.
08:02
This includes the last objective in our managing point cloud
08:06
data and recap course.