00:03
MICHAEL KILKELLY: Welcome to set up
00:04
your model and paths of travel.
00:08
Here we are in the space planning for new health
00:11
guidelines learning path.
00:14
And this is the second lesson in this workflow.
00:19
In this lesson, we're going to set up
00:21
our model, then create some preliminary movement paths.
00:25
We'll start by placing one way indicators
00:27
to mark the direction of movement in our model.
00:30
Next, we'll create paths of travel
00:32
that show the movement paths from the medical center
00:35
entrance to an exam room.
00:37
Ready to get started?
00:38
All right, let's go.
00:42
So to start, I'm going to open Revit 2021,
00:46
and I'm going to click Open to load the medical center sample
00:49
file provided with this lesson.
00:54
So here I am in the medical center model.
00:58
I'm going to click on the Working Ground Floor view
01:01
here in the project browser.
01:05
So here is my ground floor view.
01:07
Next, I'm going to click the Analyze Revit.
01:12
And the people flow toolkit is located right here next
01:16
to the path of travel tools.
01:18
So I'm going to zoom in a little bit.
01:21
And here's the main entrance to the building.
01:25
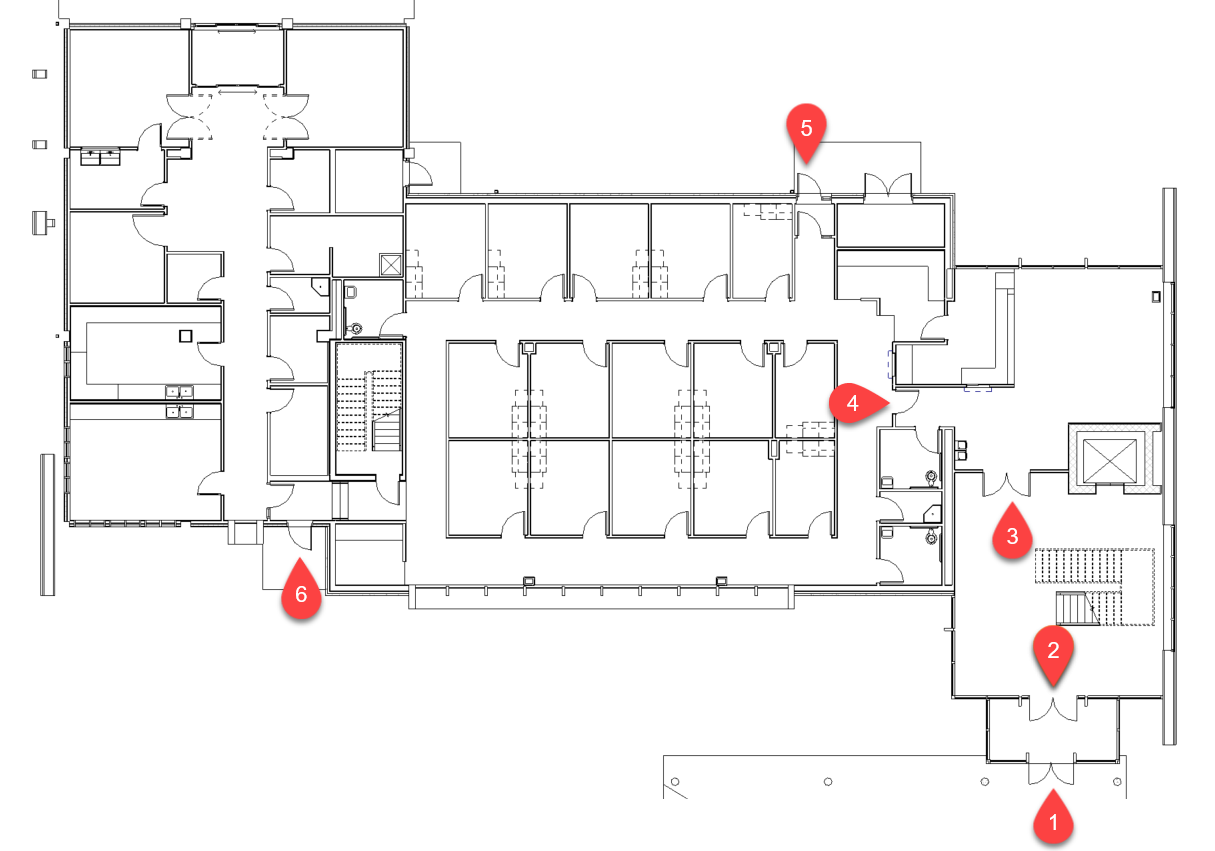
I have some exits located here.
01:28
What I want to do now is specify my entrance and exits
01:32
using the one way tool.
01:34
So let's zoom in on the main entrance.
01:39
Next, I'm going to click the one way indicator tool up here.
01:45
The one way indicator is a generic model family
01:48
that the path of travel tool uses
01:50
to determine movement paths.
01:52
I'm going to place the instance right
01:55
here on the vestibule door just like that,
01:60
and I'll add another one on the other vestibule door.
02:04
Now, if I zoom in and select the indicator,
02:08
I can see that I can control the left and right extensive it.
02:13
And if I click here, I can flip the indicator as well.
02:18
And I'll just click it again to flip it back.
02:23
So now my indicators are pointing directly
02:29
So if I click on the indicator above,
02:31
I can see that it's not fully touching the door
02:33
on the right hand side.
02:36
I want to make sure that my indicators touch geometry
02:40
So I'm going to drag the indicator over to the right
02:43
so that it touches the wall.
02:46
OK, that looks better.
02:48
Now, let's zoom back out.
02:51
And I know I want to control the flow through these two doors
02:56
on the inside of the model.
02:58
So they should be going one way into the exam area.
03:02
So let's set their direction right now.
03:05
So I zoom in on the two doors.
03:08
Then I click One Way Indicator tool to place the family.
03:13
And I click on the door to place the first indicator.
03:16
Now I'm going to place the second indicator.
03:19
I need to rotate it 90 degrees counterclockwise.
03:23
To do this, I can simply press the spacebar to cycle
03:26
through all the rotation options.
03:30
There, that's better.
03:31
Now I can position it over the second door into the exam area.
03:36
So let's zoom in a little bit to place it better.
03:41
Now I can adjust the ends of the family instance
03:44
to fit the door opening.
03:50
So these doors are all set.
03:51
Let's zoom out and add indicators to all of our exits.
03:57
I need to indicate all the exits, which are located here
04:02
Let's do them one at a time, and we'll start with this exit
04:06
So I'm going to zoom in on it here.
04:10
And now, I select the One Way Indicator tool again,
04:15
and I want to place the indicator
04:17
right over the door like this.
04:23
Next, I click on the endpoints to adjust the indicator
04:27
to match the door opening.
04:30
So now the indicator is correctly
04:32
sized to the door opening.
04:34
Let's zoom out and work on the other exit.
04:38
We'll zoom in right over here, and then again I'll
04:43
click on the One Way Indicator tool.
04:47
So to place the indicator on the door, I need to rotate it.
04:50
So I press the space bar and then
04:53
I press it again to rotate another 90 degrees.
04:57
OK, that looks good.
04:58
So I'm going to place it over the door
05:02
and then click to insert it.
05:05
Now, I need to adjust the endpoints again
05:07
to match the door opening, so I drag the controls in
05:13
And that looks much better.
05:15
OK, so now I'll zoom back out.
05:18
So now I have a first pass at controlling
05:20
the flow of movement into the building then back out.
05:24
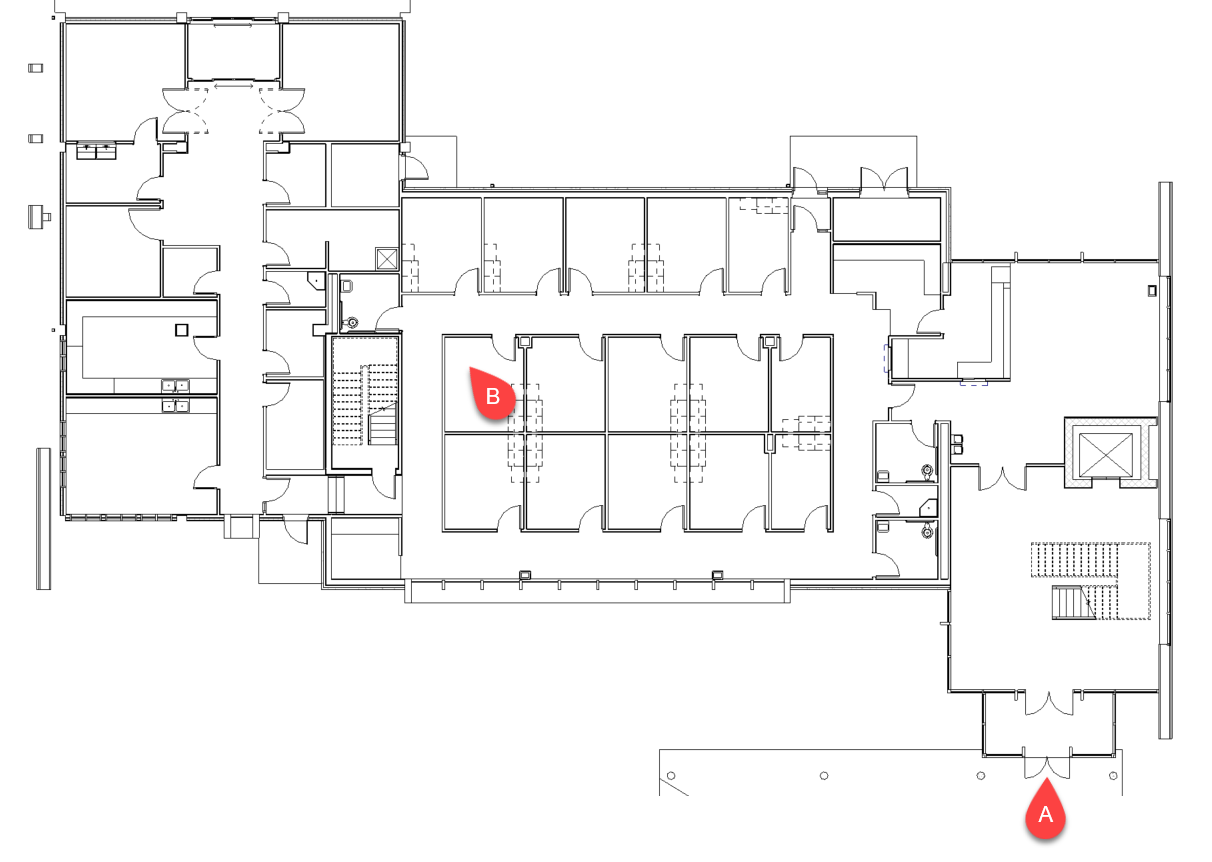
Let's go ahead and create some movement paths.
05:27
We're going to use the multiple paths tool right here.
05:30
So I click the tool and I'll keep the path separation value
05:35
at six feet since we want a six feet of social distance.
05:40
Then I click a point right here by the front entrance.
05:45
That's my start point.
05:47
Next, I'll click a point here inside the exam room.
05:51
In the tool, we'll go through and calculate the paths.
05:55
And it tells me that it generated two paths
05:60
You'll notice one of the paths is outside the building
06:02
while the other is inside.
06:05
So having patients go outside the building
06:07
to get to the exam room may not be the best approach.
06:10
But now I know that I have two options to get patients
06:13
from the front entrance to the exam room in a way that's
06:18
If I click on one of the path lines,
06:20
I can see that the distance required to travel along
06:23
the path is 117 feet, and for the second paths it's 319 feet.
06:30
So personally, I like the first path.
06:33
It's a little bit shorter.
06:35
Take a look at the activity in the next section
06:38
and give this a try yourself.