Modelling pollutants
Model the concentrations of pollutants within a network.
Tutorial resources
These downloadable resources will be used to complete this tutorial:
Step-by-step Guide
InfoWorks WS Pro is capable of modeling concentrations of dissolved substances travelling through a network. Examples includes pollutants such as nitrates.
The goal of modelling unwanted pollution is to eliminate pollutants.
- Open the BridgeNet network.
- In the Scenarios toolbar, click Create scenario.
- In the Create New Scenario dialog box, enter the name “Ex2”.
- Select Create matching scenario in the Control.
- Click OK.

- Zoom into the lower-left area of the network to find the fixed head sources.
For this exercise, you will simulate a borehole pollution incident at the lower fixed head control unit, which supplies the reservoir and, in turn, the network. In this model, the upper fixed head control unit is not running, so you will work on the lower one.
- Double-click the fixed head control with ID number 548102.
- In the Properties panel, expand Water Quality.
- In the Water Quality Concentration cell, click the More (…) button.

To edit the date, time, and concentration of the pollution incident:
- In the Fixed Head profile graph window, Under Date Time, expand the drop-down and set the date to February 5, 2022 in the proper date format for your region.
- Leave the time set to 00:00:00.
- Leave the Concentration set to 0.
- In the second row, set the same date.
- Adjust the time to 02:00:00.
- Set the Concentration to 100.
- In the third row, set the same date.
- Adjust the time to 18:00:00.
- Leave the Concentration set to 0.
Note: Do not change the start date to the current date, as the model is not set up to use any other dates as a reference point.
- Click OK.

- Commit the changes to the server.
Next, create a new solute data object:
- Right-click Solute Data Group and select New > Solute Data.
- In the New Name – Solute Data dialog box, enter the name “Nitrate”.
- Click OK.

- In the Model Group window, under Solute Data Group, double-click Nitrate.
- In the Solute Data – Nitrate window, Basic Water Quality tab, select Conservative Substance.
- Click Save.

- Close the window.
Now, create a new run:
- In the Model Group window, right click Run Group and select New > Run.
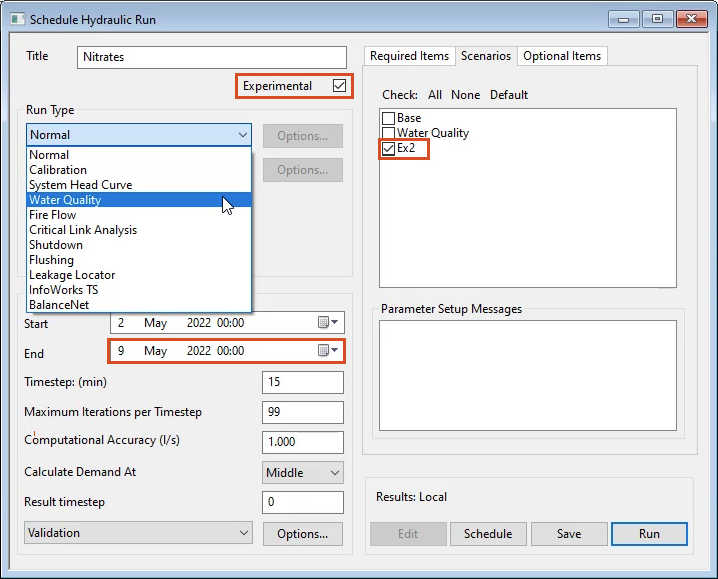
- In the Schedule Hydraulic Run dialog box, in the Title field, enter the name “Nitrates”.
- From the Model Group window, drag the BridgeNet network into the Schedule Hydraulic Run dialog box, and drop it into the Network group box.
The Control and Demand Diagram automatically populate.
- Enable Experimental.
- Under Run Parameters, set the End time to May 9, 2022.
- Leave the time set to 00:00:00.
- In the Scenarios tab, ensure that only Ex2 is enabled.
- In the Run Type group box, expand the drop-down and select Water Quality.
- From the Model Group window, drag the Nitrate solute data object into the Water Quality Options dialog box, and drop it in the Solute Data group box.
- Click OK.

- In the Schedule Hydraulic Run dialog box, click Save.
- Click Run.
In the Model Group window, the run results appear under the Nitrates run.
